If you have a water heater in your home, you probably have a thermocouple on it. The thermocouple’s job is to keep the water heater from overheating and turn it off if it does, so you don’t have to worry about it catching fire and causing damage to your home or perhaps burning it down completely. Here’s how to clean thermocouple on water heater.
What Is A Thermocouple?
A thermocouple or thermopile is used to monitor the pilot light on gas water heaters that use a pilot to fire the burner. A thermocouple is formed from multiple thermocouples that are connected in a series, giving the component more resistance than a single thermocouple. The thermocouple works as a safety precaution by stopping the gas valve from opening and potentially filling the area around the water heater with natural gas if the pilot light goes out.
Why Do I Need One for My Water Heater?
A broken or filthy thermocouple can prevent the gas valve from opening or the pilot from staying lit regularly. The burner assembly does not produce a flame as a result, and the water in the tank remains unheated.
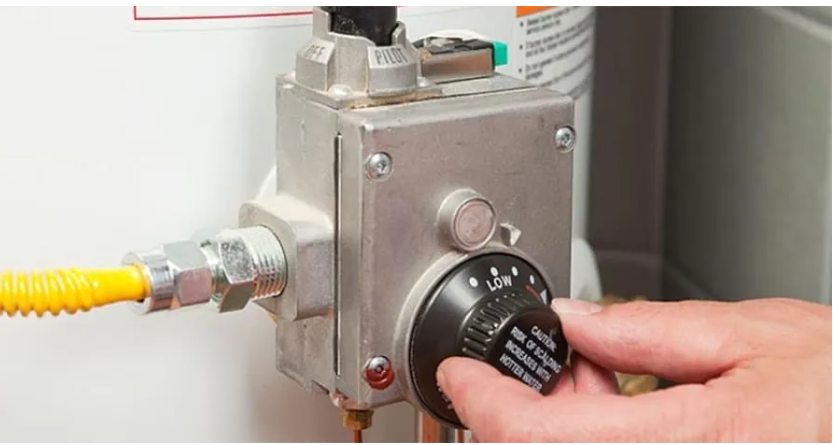
Keep in mind that if the pilot light goes out, you must relight it according to the manufacturer’s recommendations. The gas valve on newer water heaters will feature a pilot setting and a spark electrode to light the pilot. The pilot setting will be present on older models, but you will need to manually relight the pilot with a long match or lighter.
Water Heater Thermocouple Cleaning Tips
When how to clean thermocouple on water heater, you’ll need to acquire the essential supplies and tools and some basic DIY abilities. It’s a reasonably simple and uncomplicated process that you can complete yourself.
Cleaning the thermocouple on your gas water heater MAREY GA5FLP is a simple process. However, there are some preparations required to accomplish the task.
MAREY GA5FLP gas Water Heater

1 – A Wrench That Can Be Adjusted
While open-end wrenches may suffice, if you don’t know the size of the many nuts in your system, you may have these tools on hand. An adjustable wrench removes the need for many tools and increases the efficiency of your task.
2 – Emery Cloth
Emery cloth has an abrasive surface similar to that of a nail file. Emery cloth and an emery board or nail file are that an emery cloth has a fabric backing, whereas an emery board or nail file has a hardwood base. Nonetheless, the purpose is comparable. They sand or polish the thermocouple ends, eliminating oxidized layers.
3 – Lint-Free Cloth
This cleaning cloth is appropriate as a finishing touch to the thermocouple cleaning process. Its primary benefit is that it leaves no fluff on the surface. Cleaning the thermocouple is best done with a microfiber cloth.
4 – Steel Wool or a Small Brush
A tiny brush can help dust particles from the thermocouple and burner assembly; however, it isn’t required. If the emery cloth fails to remove persistent spots, you may use a steel pool.
Thermocouples on Water Heaters: Cleaning Procedures
If your water heater isn’t heating up as rapidly as it used to, there could be a problem with the thermocouple, which is the part of the water heater that controls how much gas goes through it. To clean your thermocouple, follow these instructions to find out how to clean thermocouple on water heater?
First Step: Close the Gas Inlet Valve
There is, first and primarily, the problem of safety. Turn the water heater’s fuel supply off. It is always the first step when working on a water heater. If it’s electric, turn it off. In this case, it’s gas, and you’ll need to turn off the gas valve.
Second Step: Disassemble the Burner Assembly
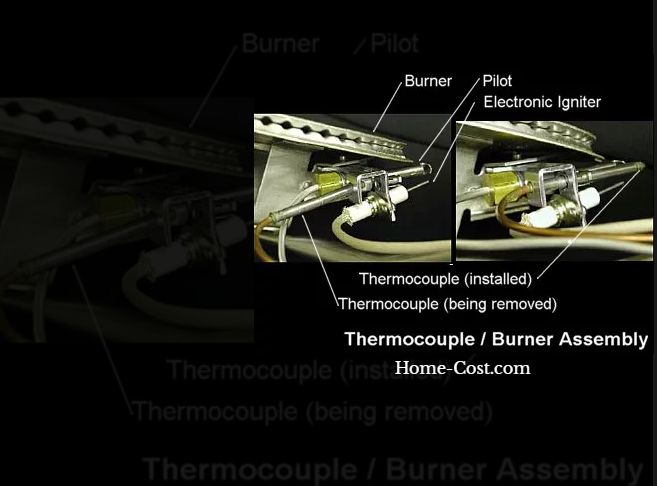
Please take a photo before you start doing anything to see how it will look after you’re completed. You’ll need to use the wrench to separate the burner component from the control center. It has three points of linkage (thermocouple, main supply tube, and pilot supply tube). After separating them, you must move the entire unit out of its container.
Third Step: Check the Thermocouple Thoroughly
With the emery cloth sander, sand the ends of a thermocouple, then wipe it down with the lint-free cloth. It’s unlikely you’ll need to disconnect the thermocouple from the assembly to get to the ends, but it’s possible. If you do, make sure you put it back together as you took it apart. Take a picture!
Fourth Step: Sanitize the Burner
While you have the burner out, this is a good opportunity to scrape any debris off the top. They will burn more efficiently if the encumbrances are removed.
Fifth Step: The Burner Assembly Must Be Replaced and Reconnected
Do you have any recollection of the photograph you took? You want it to look the same after you’re done. Reconnect the three wires to the control center of your water heater.
Sixth Step: Gather the Materials in the Sixth Step
Cleaning the thermocouple is a simple do-it-yourself project. Your toolkit’s necessary tools and supplies are sufficient; screwdrivers, emery sandpapers, lint-free clothing, and a camera are required. If you don’t already have any, they’re easy to come by at home improvement stores.
Seventh Step: Turn Off the Electricity
The first step is to turn off the power. To cut off the fuel supply to the water, turn off the gas valve. Whether you’re cleaning or replacing the thermocouple, this should be the first step for your safety. Water heaters are responsible for several residential fires and tragedies each year. Check to verify if you’re adhering to the safety guidelines.
Eighth Step: Determine the Type of Thermocouple
A thermocouple is a little metal tube or wire that connects the gas heater to the outside world. A wrench or screwdrivers are required to loosen most water heaters. Remove it and inspect it completely for corrosion and buildup. If it has rusted, the best action is to replace it. Proceed to the next cleaning procedure if you find a heap of oily muck.
Ninth Step: Corrosion and Build-Up Must Be Removed
Hold the thermocouple in your palm with care. Use emery sandpaper for sanding it. If you don’t have any sandpaper, you can use steel wool or an abrasive sponge. Use gentle, continuous pressure to remove the accumulation. Check for clean threading on the screws that connect the thermocouple to the device. If you use a cleaning product, make sure it isn’t flammable.
Tenth Step: Wash It Down
Wipe the build-up away with a lint-free soft cloth after you’re sure it’s gone. The thermocouple was cleaned and shiny if any accumulation was still present. Repeat procedures 5 and 6 until the thermocouples were clean.
Eleventh Step: Turn On the Pilot Light
After you’ve connected the unit, it’s time to double-check your work. Turn on the fuel supply and light the pilot. On the dial, adjust the temperature to your liking.
Why Replace A Thermocouple?
After knowing how to clean thermocouple on water heater? You should also know when there is no hot water running and the mistimed readings are less than 25 millivolts, it’s time to replace the thermocouple. If the dirt on the thermocouple has built up to no longer being functional, you should replace it.
If you see the following indicators, your thermocouple is likely to damage to repair and needs to be replaced:
1 – There Is No Hot Water
It will affect your entire household if your gas water heater fails. There will be no hot water for cooking or cleaning up after supper, and you will have to take cold showers, which will be difficult in the winter.
2 – Your Thermostat Has Been Set Too High
One of the most serious aspects of a defective thermocouple is that it can cause your thermostat to become overheated, resulting in a fire. This can have disastrous effects disastrous.
Faulty wiring is one reason contributing to this fire outbreak, which could result in electrical fires or even minor, unintentional blazes caused by static electricity build-up.
3 – Increased Electricity Bills
If your broken thermocouple goes overlooked, this could happen. The condition worsens when it is too late to correct the problem, increasing energy spikes due to reduced efficiency rates.
4 – The Gaseous Smell
One of the telltale symptoms that your thermocouple needs to be replaced is the smell of gas. A build-up of dangerous gases is the last thing you want to deal with. If you utilize natural gas or propane, inhaling huge amounts of it can harm your health. These gases could also cause a fire to explode.
Conclusion
It is critical to keep your thermocouple clean for it to function properly. Because your gas water heater is such a large investment, you want to ensure it works properly and lasts as long as possible. This article will undoubtedly assist you in learning how to clean thermocouple on water heater.
Cleaning out the thermocouple every six months can help prevent problems with the equipment. If you don’t know how to accomplish anything, you can employ someone who does! Because of the greater demand levels, a dirty-running appliance will show up on your monthly power bill. As a result, keep this in mind while reviewing your electricity rates each month.
Frequently Asked Questions
To test a water heater thermocouple, you’ll need a multimeter. If your thermocouple is in good working order, you should be able to measure roughly 30 or 40 millivolts of voltage. You may complete the test yourself, but you may need assistance keeping the pilot flame burning while determining if a replacement thermocouple is required.
Remove the pilot light and thermocouple from the bracket with pliers or a wrench. You can brush away carbon buildup and dust from both components with a wire brush. Use the metal file to reach hard-to-reach spots and remove stubborn buildup. It can wipe the dust away using a soft cloth or sprayed with compressed air.
The thermocouple should be checked. Possibly the thermocouple contributed to your pilot light not staying lit. Dust might accumulate on the thermocouple and obstruct the sensor. Cleaning the thermocouple and relighting the pilot light are two options. The thermocouple may need to be changed if it continues to go out.
It’s a sensor that measures the amount of oxygen in the room where the gas fireplace is installed. Its job is to turn off the fireplace if it senses that there isn’t enough oxygen present. It is a critical safety element that guards against carbon monoxide poisoning, which can be deadly.
If there is dust in the pilot assembly and it needs to be cleaned, it will create a “lazy” flame that the main burners will disturb’ airflow. The flame moves away from the thermocouple, lowering the temperature at the thermocouple’s tip. As a result, it turned the gas valve off.